A realism tattoo is not just an image placed on skin. It is light, texture, contrast, and emotion working together over the shape of your body. This Gothenburg realism tattoo guide is for people who want a custom piece with real presence – whether that means a watchful wolf, a Norse warrior, a horror-inspired portrait, or a full narrative that grows across an arm, chest, or back.
The strongest realism tattoos begin before the machine starts. They begin with a clear idea of what matters to you, an artist whose work already speaks your visual language, and enough room for the design to breathe.
What Makes a Realism Tattoo Last
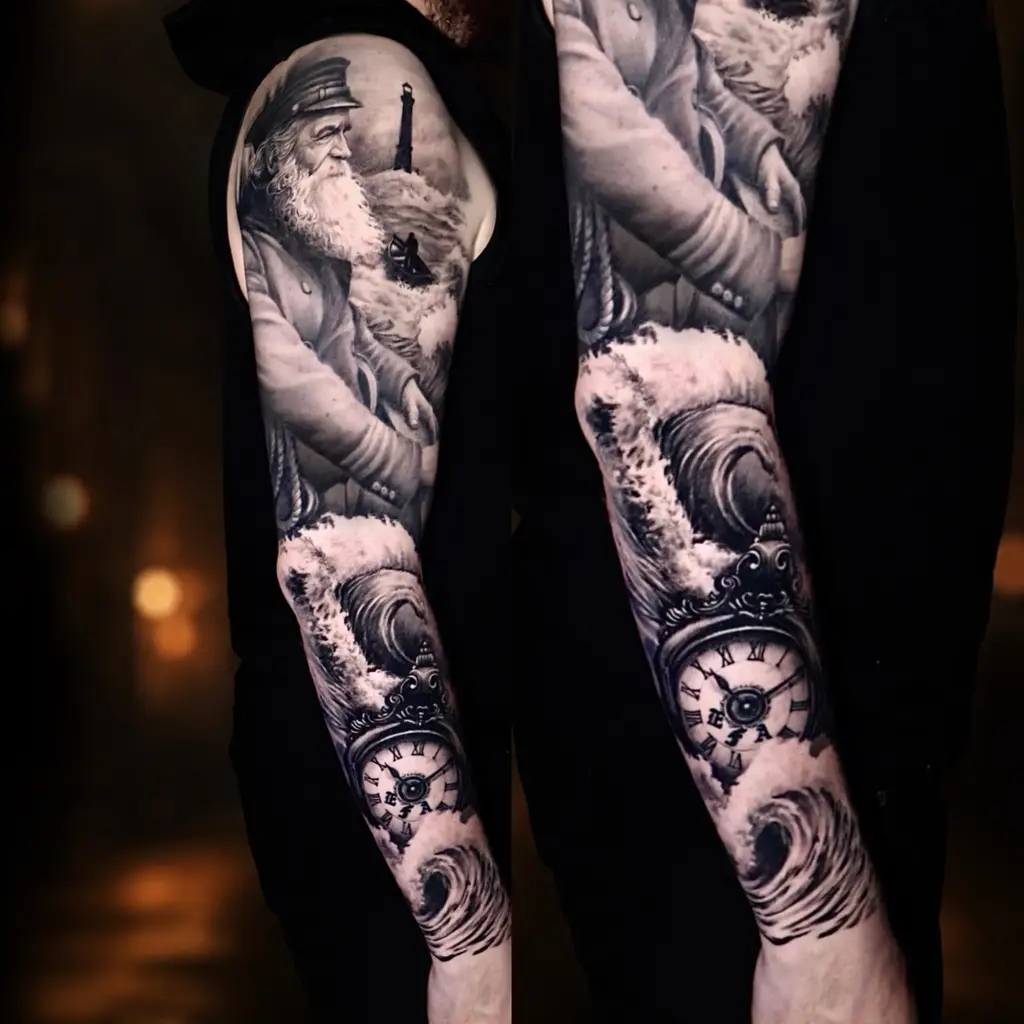
Black and gray realism relies on controlled values more than heavy outlines. The artist creates depth through soft gradients, rich blacks, carefully protected skin breaks, and fine details that suggest fur, stone, weathered metal, skin, or smoke. When it is done well, the tattoo has impact from a distance and rewards a closer look.
That balance matters because tattoos change as they heal and age. Tiny details can merge. Very pale shading can disappear if it is not supported by enough contrast. A design that looks dramatic on a flat reference image may need to be adjusted for a moving shoulder, curved forearm, or changing muscle shape.
For that reason, realism is not about copying a photo line for line. It is about translating the strongest parts of a subject into a composition that works on skin for years. Sometimes that means simplifying a background. Sometimes it means making the main face, animal, or symbol larger than you first imagined. Those decisions protect the tattoo rather than limiting it.
Start With the Story, Not the Reference Photo
Reference images are useful, but they should be a starting point. A collection of images can show the mood you want: cold Nordic forests, ravens in flight, antique armor, a favorite dog’s expression, or the shadow and grain of a classic horror scene. The final tattoo should not feel like an unedited screenshot or a random collage.
Think about the story beneath the image. Is the piece about protection, grief, heritage, survival, family, transformation, or simply your connection to a particular world of imagery? A good custom design turns that feeling into visual choices. A wolf can become a guardian. A Viking figure can be framed by storm clouds, runic textures, or broken stone. A horror subject can lean cinematic and atmospheric rather than looking like a poster pasted onto skin.
Bring several references if you have them, but explain what you like in each one. It may be the expression in one photo, the lighting in another, and the composition of a third. This gives the artist material to work with while leaving space for an original design.
Choose a Subject With Enough Visual Weight
Realism works especially well with subjects that carry recognizable texture and emotion. Animals, portraits, mythology, statues, skulls, forests, clocks, armor, and dark cinematic elements all offer strong visual material. They also combine naturally when there is a reason for them to be together.
The trade-off is that more elements do not automatically create a stronger tattoo. If every available space contains an object, the eye has nowhere to rest. A single powerful portrait with a subtle background can often feel more personal than five symbols competing for attention.
Placement Changes the Design
Placement is part of the artwork, not something decided after the design is finished. A realism tattoo should follow the body’s natural lines and take advantage of available space. The outer forearm can suit a vertical portrait or animal head. The upper arm and shoulder are excellent for flowing compositions with movement. The chest can carry a bold central image, while a backpiece offers room for atmosphere, scale, and layered storytelling.
Large-scale work gives realism the space it needs. Fine facial features, animal eyes, and complex textures need enough skin to remain readable. This does not mean every realism tattoo must become a sleeve or backpiece. Smaller pieces can be striking, but the subject needs to be selected and simplified with size in mind.
Also consider visibility and how a future tattoo might connect. If you know you want a full sleeve eventually, planning the first piece as part of that larger flow avoids awkward gaps and forced additions later. Negative space can be intentional. Skin breaks, smoke, shadows, branches, or soft fades can create natural transitions between sections.
How to Choose the Right Realism Artist
Look at healed work as well as fresh tattoos whenever possible. Fresh ink can look extremely dark and sharp, but healed work reveals how an artist handles contrast, smooth shading, and fine detail over time. Consistency matters more than one impressive photo.
Study the artist’s subject matter and composition. If you want a dark realism sleeve with mythology, wildlife, or horror influences, choose someone who regularly creates that kind of work. Technical ability is essential, but style matters too. An artist can be talented and still not be the right fit for the atmosphere you want.
You should also pay attention to whether the work feels custom. Are designs shaped around individual bodies? Do portraits have expression? Do backgrounds support the main subject instead of filling space for the sake of it? A portfolio should make you feel that the artist has a point of view.
At Dimitris Steiger tattoo , the focus is on building custom black and gray realism around the client’s idea, rather than pushing a ready-made design. That collaborative approach is particularly valuable for sleeves, backpieces, and pieces that need more than one session to develop properly.
Prepare for a Better Tattoo Session
A strong session starts with basic preparation. Get proper sleep the night before, eat a real meal, drink water, and wear clothing that gives comfortable access to the area being tattooed. Avoid arriving rushed or depleted. Long sessions demand concentration from both artist and client.
Be honest about skin sensitivities, medical concerns, previous tattoo reactions, and whether you are prone to fainting. This is not about making the process complicated. It helps create a safe, realistic plan for your body and your project.
Pain is personal. Placement, session length, sleep, stress, and your own sensitivity all affect how it feels. Bony areas and places with thin skin are often more intense, while other locations are more manageable. The useful mindset is not to prove toughness. It is to communicate, breathe, take breaks when needed, and stay focused on the result.
Healing Protects the Detail
The first weeks after a realism tattoo are part of the craft. Follow the aftercare instructions you receive, keep the tattoo clean, and use only the recommended amount of aftercare product. Over-moisturizing can be just as unhelpful as letting skin become overly dry.
Expect some redness, tenderness, and light peeling as the skin recovers. Do not pick flakes or scabs, even when the tattoo looks uneven during healing. Avoid soaking it in baths, pools, or the sea, and keep it out of direct sun. Once healed, sunscreen is one of the simplest ways to help preserve contrast and keep black and gray work looking crisp.
A realism tattoo needs patience at every stage. Give the skin time to settle between sessions, especially with larger work. Rushing the process can compromise both comfort and the final result.
Make Room for the Best Version of the Idea
The most memorable tattoos are not always the ones with the most detail. They are the ones where the subject, placement, and emotion work as one. Be open when an artist suggests changing scale, shifting an element, or removing a background detail that does not serve the piece. That is often where a good concept becomes a tattoo with lasting power.
Bring your story, your references, and a willingness to collaborate. The right custom realism tattoo should feel like it belongs to you before it ever becomes part of you.